Thursday, December 29, 2011

Clothespin Art Hanger

Hang pictures with clothes pins on a string hanging from the wall in their room.  (Scroll down for the tutorial)

So I have already put a tutorial for storing kid projects so that they can still look at them whenever they want after I put them away but I had yet to come up with a good way to display all of the drawings and paintings that are coming home on a daily basis before I store them.  Not to mention we just had Christmas here so everyone was sending the kids cards that we had on a kid table in their room but they kept falling over.  Here is the solution I came up with:


I probably need to give you the back story to this photo.  It was originally a craft room and so those shelves extended all the way down the wall.  When my boyfriend and his 4 and 5 year old moved in, we converted it to a kids room.  We removed most of the shelves because they are not secure on the wall hooks and would not be safe for the kids which is why we have those long things extending down from the shelves (although there are another of different ways to hang these without needing the same setup I have). 

How to make the Clothespin Art Hanger:

Supplies:
-Plastic clothesline or any type of string or twine (from the Dollar Tree)
-picture hanging wire or several paperclips (I used 16guage jewelry wire from my stash)
-clothespins (from Dollar Tree)
-screws (optional)

1.  Make a loop in the wire (or open up a paperclip), string the clothesline through the loop and then attach the wire by stringing it through the holes, securing it with a few twists.  There are a few variations of these instructions.  You can simply place a few screws in the wall and tie the string around the screws if you do not have a fancy setup like mine.  You can also fore go the wire and attach a few screws into the shelf itself and string the clothesline that way.


2.  Hang pictures and Christmas cards with the clothespins. 

Friday, December 23, 2011

DIY Name Etched Pyrex Pan Gift

It is really annoying to go to someone's house and leave your pan, or drop off a dish for someone and never see your pan again.  Especially if it is one of those glass Pyrex ones.  What a great idea it is to have your name permanently etched into the glass so you will never lose it again!  It's creative and looks much nicer than a piece of tape on the bottom of the pan.  I loved working on this project because it was so easy, quick, inexpensive and made a wonderful gift.  I found the idea on a blog tagged in Pinterest.  Look out friends and families who are ever having a baby, getting married, or are having a house warming party because this is what you are getting!


Supplies:
-Pyrex Pan
-Brush ( I used a $0.25 Foam Brush from Michaels)
 -Armour Etch Cream ( 3oz bottle was $13 at Michaels, use a 50% off coupon!)
-Contact Paper (from the kitchen section of Walmart)
-Exacto Knife (craft section at Walmart)
- Font of your choice/size printed on regular printer paper or use a Cricut machine
- masking tape
-cutting board or other hard surface to cut on
-sticky vinyl stencils (found in the craft paint section at Walmart)

 Directions:


1.  Choose a font that will be easy to cut out.  The more square the letters, the easier it is. The larger the print, the easier to cut it out.  Print onto regular printer paper.  You can also use one of those fancy Cricut machines but I'm guessing if you have one and know how to use one, you probably don't need this tutorial. 

2.  Cut out a piece of contact paper at least 1" larger all the way around the words and tape the font page underneath the contact paper (do not remove the backing on the contact paper yet) to your cutting board.  I have a basic tile kitchen table so I just taped it to that. 

3.  Using the exacto knife, trace and cut the letters out of the contact paper.  Save the cut outs so that you can use the centers of the A's and e's etc later. When you are finished, you can throw away the printer paper with the font on it, you don't need it anymore.

4.  Pull the backing off the contact paper and stick it to the outside of the Pyrex pan where you want the letters to be.  Fill in the center of the letters such as O's A's e's etc with the pieces from the letters you cut out earlier.  Make sure to check that all the edges around the letters are properly adhered to the glass, you do not want etch cream to get underneath the contact paper because once the cream etches, its permanent.

5.  Follow the instructions on the bottle of the etch cream*  Using the foam brush, paint the parts of the contact paper where you cut out the letters.  You want to use a generous amount to fully cover the letters.  If you don't use enough, the cream will only etch some parts of the letters (which you can go back later with a small paintbrush and paint in if this happens, ) and if you use too much it will drip (I have done this also and there is no fixing this if it drips down onto the glass.  If it drips and you catch it immediately, you can wipe it off, but if it sits for any amount of time, it will start to etch the glass).  I found that I needed to leave the cream on for at least 10-12 minutes in order for everything to fully etch (which is double the manufacturer's recommended time).

*Note- The bottle I had said to leave the cream on for 5 minutes and to use their stencils.  I made my own stencil using contact paper and left it on for 10 minutes.

When done, use your fingers and water to rinse off the etching cream, pull off the contact paper and clean all the etch cream off.  Dry off completely and check for any place that needs touched up. Use a small paintbrush to apply etch cream to touch up areas and leave on for another 10 minutes.

This photo shows the vinyl stencil that I used on the opposite side of the name.  I gave it as a house warming gift at a party where it was requested to bring a dish.  I baked buffalo chicken dip in it and left it for the homeowner to find later when they cleaned up.  You can also leave a recipe instead of baking something in it, or fill it with kitchen utensils.

DIY Etched Photo Candle Holder

Similar to my Photo Candle Vase, this project was inspired from a number of DIY projects.  I followed the instructions on how to etch glass that I found on Pinterest and added my own twist.  Etching glass is a process of permanently changing the surface of the glass, in this case it is an acidic cream that eats away at the surface of the glass (will not wash off).  I also evolved my process from this original photo glass candle vase idea.  I will go over my process in detail so you can see how easy it really is to make this.

Supplies:
-Jar, vase or candle holder of your choice (I got mine for a $1 at Dollar Tree).
-Brush ( I used a $0.25 Foam Brush from Michaels)
 -Armour Etch Cream ( 3oz bottle was $13 at Michaels, use a 50% off coupon!)
-Contact Paper (from the kitchen section of Walmart)
-Exacto Knife (craft section at Walmart)
-Clear sticker paper (I found this onsale at Walmart, 8.5x11 sheets by Avery)
- Dripless votives (bought mine in bulk at IKEA, dripless candles are fine also)
- Font of your choice/size printed on regular printer paper or use a Cricut machine
- masking tape
-cutting board or other hard surface to cut on
-computer/printer

 Directions:

1.  Choose a font that will be easy to cut out.  The more square the letters, the easier it is.  Also make it as large as you can but will still fit on the vase (easier to cut with a exacto knife).  My vases were 6" tall and I used size 60 font.  Print onto regular printer paper.  You can also use one of those fancy Cricut machines but I'm guessing if you have one and know how to use one, you probably don't need this tutorial. 

2.  Cut out a piece of contact paper at least 1" larger all the way around the words and tape the font page underneath the contact paper (do not remove the backing on the contact paper yet) to your cutting board.  I have a basic tile kitchen table so I just taped it to that. 

3.  Using the exacto knife, trace and cut the letters out of the contact paper.  Save the cut outs so that you can use the centers of the A's and e's etc later. When you are finished, you can throw away the printer paper with the font on it, you don't need it anymore.

4.  Pull the backing off the contact paper and stick it to the face of the vase where you want the letters to be.  Fill in the center of the letters such as O's A's e's etc with the pieces from the letters you cut out earlier.  Make sure to check that all the edges around the letters are properly adhered to the glass, you do not want etch cream to get underneath the contact paper because once the cream etches, its permanent.

5.  Follow the instructions on the bottle of the etch cream*  Using the foam brush, paint the parts of the contact paper where you cut out the letters.  You want to use a generous amount to fully cover the letters.  If you don't use enough, the cream will only etch some parts of the letters (which you can go back later with a small paintbrush and paint in if this happens, ) and if you use too much it will drip (I have done this also and there is no fixing this if it drips down onto the glass.  If it drips and you catch it immediately, you can wipe it off, but if it sits for any amount of time, it will start to etch the glass).  I found that I needed to leave the cream on for at least 10-12 minutes in order for everything to fully etch (which is double the manufacturer's recommended time).

*Note- The bottle I had said to leave the cream on for 5 minutes and to use their stencils.  I made my own stencil using contact paper and left it on for 10 minutes.

When done, use your fingers and water to rinse off the etching cream, pull off the contact paper and clean all the etch cream off.  Dry off completely and check for any place that needs touched up. Use a small paintbrush to apply etch cream to touch up areas and leave on for another 10 minutes.

6.  Follow the instructions for printing the photo onto the sticker paper, cut to size and apply to the outside of the glass, opposite to the etching.  I have found it looks much nicer and the etching and flame is easier to see with a darker background photo.  Use the side of a credit card or thick business card gently to rub out any bubbles. 

Although the etching is washable, the sticker paper probably isn't so I would recommend using a dripless candle or votive inside the vase.  The photo will look great from the outside when lit up by the candle.

Storage Book for School Projects

My boyfriend and his two daughters just moved in with me and one just started Kindergarten.  As there are many new and exciting things for all of us to get used to during this process, one of the biggest shocks has been the sudden lack of space and storage (as I am sure many of you established families are suffering from as well).  I found a link to this blog on Pinterest for making a book out of Christmas/Holiday cards and it inspired me. 

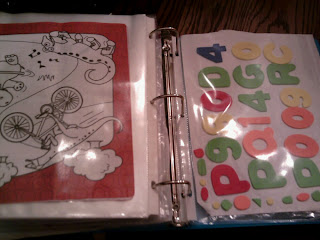
We desperately needed a place to store all of the overwhelming number of wonderful projects our Kindergartner is bringing home.  I am not ready to throw them away and she loves going back through them to ready them.  Instead I added page protectors to a binder and put all the flat papers in there. 


For the 3D items, I took gallon sized Ziploc bags, 3 Hole punched them and placed them in a binder. The binder goes on the shelf with their books and voila! It protects and preserves them and no more projects everywhere.


Sunday, December 18, 2011

DIY Photo Candle Vase

This year for Christmas, I wanted to make all of my gifts.  Not only are they thoughtful and usually much more appreciated, they are much lighter on the wallet as well.  Others, namely coworkers of myself and significant other have asked if I would also make various items for them to give out at Christmas time, mostly personalized items with photos.

One particular person gave me quite the challenge with a photo that was a scan of a copy of a photo and because of this was very grainy and not easy to duplicate for use in my project.  Due to the sensitive nature behind the request, I was determined to come up with something that would beautifully exhibit this photo and make a wonderful gift.  I found several ideas on my favorite website, Pinterest and tried every one of them.  I tried transferring the image to a canvas using tissue paper and also regular printer paper and then rubbing it off with water to get a "faux grainy" look but since the original photo was already grainy and was hard to see.

Then I saw an idea on pinterest to do a transparent photo on a candle glass with no other instructions other than photo printed on vellum paper put on glass.  I tried several ways of attaching the printed vellum (which was a chore in and of itself) using modge podge and spray adhesive and all that did was make the corners curl and leave bubbles and wrinkles.  Next I found 8.5x11 sheets of clear printable inkjet sticker pages.  It was so easy, I just ran it through the printer, and slowly (needed two people for this) we wrapped the page around the vase, using the edge of a credit card as we went to smooth out bubbles and wrinkles.  It took several tries of attaching and unattaching the sticker to get it lined up right, but with patience, we managed it.

There are still a few very small bubbles and unavoidable wrinkles, but overall it worked out great.  The seam did not want to stick very well so I used modge podge along the edges which took a few days to dry, then added ribbon along the seam and across the top and bottom to hide the edges and wrinkles.

I put a tea light in the bottom and would almost prefer to use a non-flame candle such as those faux electric candles to avoid heating the glass and adhesive from the sticker, but so far the tea lights do not seem to be a problem.  The tealights are great too because they do not make a waxy mess inside the vase nor do they put off any black soot that can stain the inside of the glass.  The light from the candle really illuminates the image (which even looks great when its not lit).  Uunfortunately I didn't think to photo the process, but here is a picture of the result.