Wednesday, January 29, 2014

Craft Room Overhaul

Photo
All the junk piled up in my craft room. 
Photo
My complete lack of organization.  The carpets are destroyed too.
To say my craft room is a disaster is an understatement.  We just bought our house about 7 months ago and before we bought it, it had renters living in it who did a lot of damage which was not aparent until we took posession of the home and it was finally empty.  Previous owners/renters threw darts and knives or stars or something at the walls, ceilings, doors and wood trim throughout the house, but it was the worst in my craft room. 

Photo
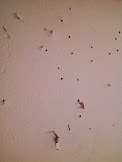
Hundreds of holes from darts, throwing stars or knives (we guess) on walls, ceilings, trim and doors throughout the house.

Also, gross alert (sorry, I don't know how else to describe it and not be completely disgusted by it) their kids wiped boogers all over everything...there were even words written on the walls of my craft room.  SO GROSS!  I think we need a biohazard team to come in just to paint.  Not to mention the carpet, lets just say I won't walk around without my shoes on even though we had them professionally cleaned 3 times.  Ok, end of grossness, enough said. 


Photo
Previous owners had painted over stained trim throughout the house without priming it first...which means all of the door frames, floor trim and window trim looks like this and must be scraped, sanded and primed 3 times before we can paint 2 more coats. 
Someone had painted over stained trim throughout the house without priming it first...which means all of the door frames, floor trim and window trim looks like this and must be sanded and primed 3 times before we can paint 2 more coats.  Anyway the room became a complete dumping ground and without shelves in the closets or walls, it was really hard to put anything away. 

Finally I decided how to tackle the room.  I masked up and used heavy grit sandpaper to sand the grossness off the walls (easier than washing with bleach).  Since there was so much damage to the walls from the darts/knives and some of the drywall was pulled out, my husband taught me a cool trick to fix it without having to mud multiple times.  You take the rounded side of a ball peen hammer and literally hammer a dent into the damaged part (not too deep, just deep enough so all of the sticking out parts are knocked in).  This seems counter intuitive, like its going to do more damage than good, but bare with me.  Then you take a spackle knife and drywall mud and fill the hole with mud.  Don't be afraid to use too much, more is better, you can always sand off the extra.  Every once in a while if you had a large hole, it may sink in a little and you may have to do a second round of mud once the first has dried, but usually not.  This makes the entire thing flat and you just sand the rough edges with a sand block and it's ready to prime!  I used a primer like Kilz to neutralize any biohazard and cover up all of the stains/muck on the walls.  It took two coats.  Finally its ready to paint.  I chose this pretty yellow as a base coat.
Photo: Painting my craft room this lovely shade of yellow then using my homemade stencils.  Check out my craft page, Etchable Me for more pics and how tos. Can't wait till its done!
Becuase I had so much junk in the room and I'm trying to craft in it at the same time, I am doing two walls at a time so that the stuff can be stacked up against two walls and then moved to the other two walls when I'm done. 

I then used plastic folders and designed my own stencils in my Silhouette Cameo software.  Tutorial to come when I am finished.  I cut the folders down so I had two large flat 8.5x11 sheets and two smaller sheets out of the flaps.  I loaded them into my Silhouette and had to put them on the highest setting to cut the stencil.  It cut about 3/4 of the way through the stencil and basically scored it and then I used a dull exacto knife (a sharp one accidently cut through the stencil where it wasn't even scored) to cut the rest of the way through the stencil.
 

I made one stencil out of the big one and will be making one out of the small one for the walls in a pretty coral orange color. Then I made a different stencil to make curtains.

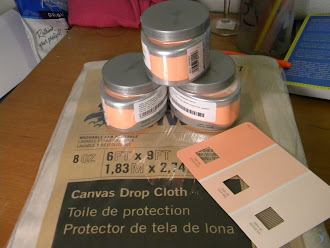
For the curtains I bought two 6'x9' cloth drop cloths and will cut them in half  to make two panels for each window in the room.  I plan to stencil them with the coral paint also.  Separate blog post to come for this process when I'm done with it.  I am currently washing the cloths (I tried ironing them and they were too thick).

My husband is also going to build me a large work bench for the center of the room, floor to ceiling shelves, and a wrap-around counter top on two walls with storage underneath.  We are going to pull up the carpet and either just paint the wood floor or install cheap vinyl so it can get crafts spilled on it and can easily be cleaned up.  I can't wait to show you when it is all done!

Wednesday, January 22, 2014

Fabric Yarn- Barbie Clothes, Finger Knitting, and Braided Tee Shirt Rugs

Excuse the cell phone pictures on this post, since it was a 5 day weekend due to snow, I was home with my 6 and 7 year old stepdaughters and we did a lot of crafting that I wanted to write about.  A year or two ago, I went on a fabric yarn making frenzy and cleaned out the Goodwill of about 20+ tee shirts and 2-3 sheets and made 6 or 8 balls of yarn.  For a great video tutorial on how to make continuous tee shirt yarn, view this youtube video.  My intentions had been to crochet a rug (which I made a small one and gave to my little cousin), flowers, place mats and whatever else I could think of.  Eventually I ran out of steam and put it away.  Well I found the giant box of yarn and leftover tee shirts while setting up my craft room and was inspired all over again.  This time the girls got into the box and were so excited by all of the giant yarn that they too had grand ideas for it all.  I recently taught them how to weave on a homemade weaving loom and so they asked if they could weave with it.  This reminded me of a skill I possessed but had long since forgotten I knew it: finger knitting! The pulled tee shirt yarn, shown in the tie dye blue and brown balls would be the perfect size for them and would make something quickly (since they are easily bored by projects that take more than one sitting to complete).

This is the finger knit scarf that I made, it took me less than 10 minutes.
So, I found this video to remind myself of how to start the knitting and showed it to the girls and we got started.  They loved it!  They made some of all different colors as scarfs for their various stuffed animals.  When they got bored of that, they taped the long strands of yarn from wall to wall in their rooms and pretended they were giant spider webs.  Hey, I say whatever gets their imagination going, and it was funny to see their rooms covered in the yarn. 
While they were busy finger knitting, I decided to take some of the tee shirts that I had not yet cut up and made strips of about a yard and created this awesome braided tee shirt rug.  Here is a decent tutorial video I found on youtube that will show you the process.  The only thing I did differently was instead of sewing the strips together when I needed to add more yarn, which was time consuming, I used the slit-cut and knot method as shown by option # 2 in this video.  Any of the methods work, it is just a matter of preference.  I found this to be the quickest way, and I didn't mind the knot showing in my rug.  So far I have used 3 large size tee shirts (for the 3 different colors in the braid) cut in 1" strips and it has made a 20" round rug.  I did start the rug as an oval shape with about a 4" start length however the rug has rounded out completely as it grew in size.  My only complaint about using the oval shape in the beginning is that about half way through, the rug started to buckle a little.  I think because the tee shirt material is stretchy, as I add more, it will flatten out or be able to be stretched out.  I am guessing that if I had started with a round pattern, this would not have been an issue.  I would like to get 3 more tee shirts to at least double the size of the rug.  At $1/tee shirt from Goodwill, you can't beat the price and it has been fun and quick! Excuse the blurry picture again.  This one is being made out of two flat bedsheets with 1" strips.  Although using larger strips would have made it go faster, I liked the look of the smaller braided strips.  I have used up an entire spool of thread on this one which is why I stopped.  It currently measures at 20x23.  I used a 7" start strip on this one which seems to have kept the oval shape a little better but I suspect by the time I am finished, it too will round out.  I have also experienced some buckling in this one, but less of it.  There is no stretch to the bed sheet material so it will not stretch out.  I did see in one youtube video where someone had sewn a bath towel to the bottom of it.  I wonder if I were to find a stiffer/thicker material like this for the bottom that this might help flatten out the buckling as well.  

There are several things I liked about using the bedsheet.  The fabric frayed a lot as I was cutting and braiding it (which was a pain in the process) but has a beautiful subtle texture that I really like once finished.  The material is flatter and since I only used two colors that were very similar, the braids blend more and I love the texture that combination created.  I would say I went through about 3/4 of the sheet material and would like to also make this rug much larger.  I may need another sheet to finish it. 

Having cut up the tee shirts, the only part I didn't use were the hems and the sleeves, which I'd saved. One of the girls had complained that she lost Ken's shirt and I thought about all the barbie clothes I'd been handed down as a kid and fondly remember that someone had meticulously sewn some of the clothes.  I didn't have a pattern and not even knowing if it would work, I quickly laid the dolls down on the sleeves of the tee shirts, traced them onto the fabric with a marker and sewed then cut out the shape.  They took me all of 5 minutes (hence the sloppy lines and ill fit) but the girls were ecstatic and asked me to make more of them.  Going forward, I would definitely find a pattern and spend more time to perfect them, but it made the girls happy and that was all that mattered.  They couldn't wait to show their daddy when he got home from work.
I don't remember Ken looking this creepy when I was a kid.  I liked him better when his hair was plastic and his joints didn't bend.
I don't think there is much creepier than a Monster High doll.  They have giant heads, long torsos, huge butts and all of their joints come apart.  Super creepy!
As you can see, this Monster High doll is missing several body parts...they kept popping off when I tried to put the clothes on them.  Ew.  Either way, just tracing the bodies directly onto the fabric worked pretty well when the body parts would stay on hah!

Saturday, January 18, 2014

Blueberry Ice Cream

Although the candy cane ice cream is by far our favorite, the blueberry ice cream (which I'd never seen made before) was really good also.  We don't normally buy blueberries, they are a bit sour for me, but the kids begged me and they were on sale, buy one get one free, so we got them, and then no one ate them.  Since I have this awesome, brand new ice cream maker and I couldn't let the blueberries go to waste, I thought, why not turn it into ice cream.  I did a search on the internet and came across a recipe from the same person who posted the candy cane ice cream!  I knew it would be really good and I was not disappointed.  The only thing I did different was after blending.  Because I used a smoothie blender which purposely has a dull blade to keep the the smoothie thicker, it did not chop up the skins of the blueberries.  I used a very small strainer and pushed the mix through the strainer and as you can see it got out most, but not all of the skins.  I was okay with this, I think it added to the flavor and the visual effect.  And even more beautiful was the amazing purple color the ice cream turned from the blueberries.


Tuesday, January 14, 2014

Candy Cane Peppermint Ice Cream

For Christmas we got an awesome cuisinart ice cream maker and we have been making ice cream like it was going out of style.   So far we've made vanilla, chocolate custard, strawberry kiwi sorbet from fresh fruit, and candy cane Peppermint Ice Cream which is by far our favorite.  We had so many left over candy canes and usually they get thrown out, but not this year!  I found this recipe and was really drawn in by her beautiful photos.   The ice cream turned out just like store bought only better.  It was incredibly rich and sweet and we loved how the candy canes turned the ice cream pink!   Here is the Recipe. Although my photos aren't nearly as awesome as the recipe 's,  I thought maybe you'd want photos of the process and final result. 

Thursday, January 2, 2014

DIY Wedding Flowers

The actual bouquet
I was not one of those brides who spent 

Her whole life planning every detail of her wedding with one exception; the flowers.  Through high school and part of college, I worked in a flower shop and my favorite job was to deliver and set up the wedding flowers.  It was always so exciting to be a small part of such an important event and I knew that was the one thing I was going to do for myself, if nothing else.
I started out by googling wedding flowers and kept a pinterest folder of flowers I loved. I probably had hundreds of photos. I chose the color scheme for my entire wedding based on the availability of flowers for the time of year I was getting married (October). I searched for flower combinations in the colors I loved and came up with a large list of flowers options. Next, I researched availability and pricing. I looked for companies that sold wholesale. By keeping the flowers the same across the board from bouquets to center pieces to boutineres, you can save a lot of money by ordering in bulk. If you are really feeling adventurous and want to save even more money, do like I did and order a themed mix.  The mixes come in a large variety usually by color or season. They don't tell your every single flower (growers choice) but I called a week ahead and asked what and how many of each I would be receiving so I could plan ahead. You can also get a good idea of what variety of flowers might be in it by asking what they are sending out now.  
This was how the flowers arrived from the grower, FED-EX. COSTCO was the wholesaler.

Finding a reputable wholesaler can be tricky. Ask your local florists for the name of their wholesaler, ask your florist how much they would charge to order and and store them or even deliver them for you. Check with wholesale stores such as costco, Sams club or BJ's.   You need a membership to shop here but some will give temporary passes. I went through Costco and had a family member with a membership order them for me online. I found they had the best variety and a great price. 
Flowers rehydrating after I unpacked, trimmed and de-leafed them. This was a fall mixed bulk pack.

You will want to order no less than three weeks out, some places need a month or more. The flowers were delivered to my house directly from the grower 4 days in advance of the wedding.  Because the flowers arrive tightly packed in a box with no water, and the heads are usually still closed, this gives them time to open up and rehydrate. I bought five $5 five gallon buckets from the hardware store and dumped the food packets that come with the flowers along with the water. Cut the stems at an angle several inches from the bottom of the stems. Pull off all the leaves to reduce bulk in the vase or bouquet handles. I stored the flowers buckets in the garage since it was fall it was the perfect cool place not too hot or cold. Whatever you do, don't put them in the regular refrigerator unless you turn the temp way up to 65 or 70. I learned the hard way when we went to walk down the aisle, all of the boutineres were wilted so we had to go without.
When it came time to transport, we dumped most of the water and loaded the buckets in the back of someone's SUV and did all of the arrangements in the kitchen of the venue. The night before the wedding, I put together all of the arrangements and set them out on the tables. I also made the cake topper and corsages and boutineres the day before. The day of all I had to do was wrap and trim the stems on the bouquets, cut and suspend the carnations.  It rained so instead of hanging the carnations from the gazebo, we hung them in the window overlooking the lake behind the head table.  They were beautiful!
Another thing I did that I was so greatful I had thought of it, I went to the grocery store and picked out a $10 or $15 bouquet that had similar flowers, shapes and sizes as what I was having in my actual bouquet and spent several hours practicing making bouquets and then finally a centerpiece.  Since it had been so long since I had worked in the flower shop, I was quite rusty.  The practice was great because I could take it apart and put it back together as many times as I needed to get it right.  That way, on the day of the wedding, I was not stressing about my flowers not turning out right, because I already had figured out exactly how many stems of what I was going to need and how they would fit together.  Also, during practice, it didn't matter if I accident broke a stem or messed up the ribbon because it was just practice. Shown below is a photo of the practice bouquet.  Also on the day of, make your toss bouquet first as a warm up so if you mess it up, it doesn't matter because it is only getting destroyed anyway!  Last piece of advice, have a second person there to help you.  That way as you are working on the bouquets, they can hold them as you add flowers and can turn the bouquets so you don't have to worry about dropping or smushing them.
I hope you enjoy making your bouquet as much as I did.  Don't stress out, it is supposed to a fun and wonderfully satisfying personal touch that you have for your special day!
So beautiful and easy!
My hanging flower/gazebo inspiration
My practice at hanging flowers for the gazebo- they are hung from fishline in a doorway
Bouquet practice from $15 grocery store flowers
The actual bouquet