Wednesday, June 27, 2012

Bleached Recycled T-Shirt Covered Recipe Book


Ugly old Photo Binder
 

Pretty New Binder


I have this really ugly photo book that I got for free that I have been using as a recipe book.  I write my recipes on index cards and put them in the sleeves.  I have been thinking about recovering it with fabric but don't have any scraps at the moment.  I do however have this old t-shirt that I accidently ruined with superglue that would look awesome with a bleach treatment.  I have never done the bleach treatments before so here is the tutorial.  Did a few things right and a few wrong.  Only way to learn!
 Supplies:
-Cheap paintbrushes (you don't mind if they get ruined)
-book
-old t-shirt
-bleach (I had general cleaner with bleach in it and it worked just as well as plain bleach.  I figured this out by accident, ruined a favorite skirt while cleaning)
-Glue (I used spray glue, modge podge works just as well)
-exacto knives ( used multiple tips that allowed me to get the curves better)
-contact paper
-pattern (optional, printed from online)
-Piece of scrap cardboard


I printed a clipart from online and put it on the clipboard with a piece of contact paper over top.  I used the exacto knives to cut out the clipart from the contact paper. 


Recipes on index cards in the recipe book.  The open book fits on the tee shirt.  I put a piece of cardboard between the layers of the t-shirt so it didn't leak through and make a mess.
To see exactly where to put the images on the t-shirt, I cut pieces of paper the same size as the front cover, binding and back cover.


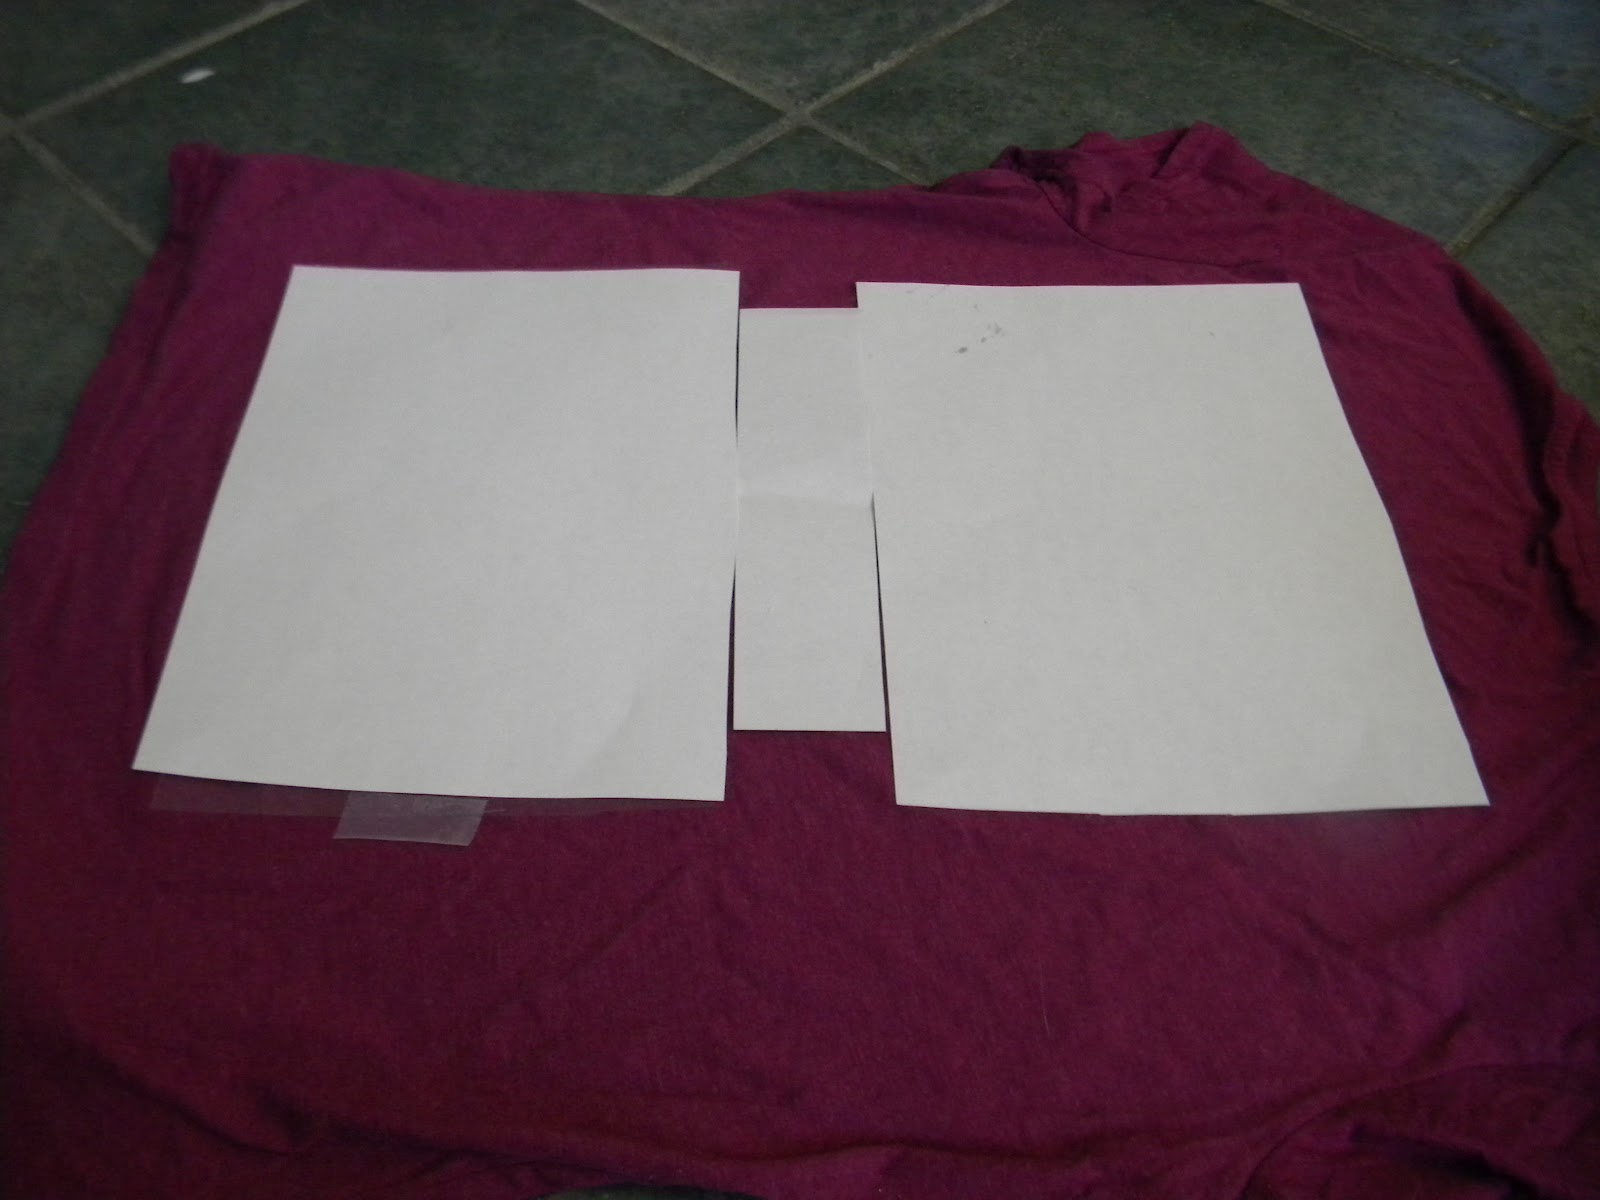
And laid them out on the t-shirt

I then stuck the contact paper to the t-shirt where the pages were, leaving the binding paper in place as a reference.
 
Here is where things stopped working as I expected.  I used paintbrushes to brush on the bleach...and it bled quite a bit under the contact paper (as you can see from the design on the left).  To compensate, for the design on the right, I used a brush that was much smaller than the cut out area to allow for some bleeding.  I then peeled off the contact paper and hand painted a few flowers in the gaps.  It took about 5-10 minutes for the bleach to fully change the color.  I intended to leave it on for 20 minutes to be sure it set and then this happened....


Before.
After.  The bleach ate the brushes.  It was only a matter of time before it ate into the t-shirt too.


I Washed and dried the tshirt by itself.  I opened the book and laid it across the images.  Traced with a marker, leaving one inch extra on each side and cut it out.

I Rolled the image and press flat with my hands, making sure to get out all of the wrinkles.  Sprayed the front of the book with the spray glue.  Placed the roll on the book making sure to leave an inch around all edges.  Unrolled a little at a time making sure to pull taught to keep any wrinkles from forming.  It takes a little bit for the glue to set so if there is a wrinkle, you should be able to pull the fabric back up and press out the wrinkle with your hands.  Do this for the binding and the back of the book, being careful when spraying not to get glue inside the book. 

When I was done covering the outside of the book, I left an inch of fabric around each edge.  I Used modge podge and a brush, put glue on the book around the edges and press the fabric down flat.  I was not too concerned with flat edges so I didnt cut the fabric very straight (I don't have that kind of patience).  I left it open for the glue to dry. 

Front
Back
 

Tuesday, June 26, 2012

Icing Trials

I made 3 different batches of icing today and have been trying to teach myself to decorate cakes.  It is so much harder than it looks in all the tutorials and youtube videos!  Here are all of my failed attempts from today.  I guess on this project, practice is going to have to make perfect cause I'm not getting it the first several batches that I've tried.
Buttercream icing roses turned out more like cabbages hah!  They were so flat, I don't know yet what I did wrong here.

these are supposed to be apple blossoms and it is just a table of complete mess.

These were supposed to be swirl drop flowers out of buttercream but no matter how many I made, I couldn't get it to work.  These things still look cool though, whatever they are.

These are made out of royal icing and although they are cool looking, they were completely 2 dimensional, I was trying to make regular roses.  the smaller "flowers" if you can call them that were supposed to be apple blossoms but I couldn't figure out that technique either.  They do look quite a bit better after drying.  When they were wet, they just looked like messy blobs.

This was after I gave up on flowers altogether and tried to use up the rest of the royal icing with the only technique I've mastered...the swirl.  Still haven't figured out how to make the leaves have just one point.  When I pull away, they always have 2.  I've kind of figured out if I pull up sometimes they have one point like normal.  I think with more practice I'll get the leaf figured out.

Covering oreos with marshmallow fondant.  That was so hard!  It wanted to wrinkle at the bottom even if I cut it to size.  Trimming the extra off was difficult too.

Oh what a mess.  If the boyfriend came home 10 minutes sooner to this mess, he would have had a cow!

Added embellishments from a previous decorations practice, those were royal icing I think.

These stacked oreos look like baby cakes,  the photos make it look better than it looks in real life.  Its very sloppy.

I got the cookie crumbs and icing all over the white fondant

My poor attempt at piping, broke when I put it on top.  I also cut the fondant too small and it didn't wrap around the cookie.  Fail.

More cabbages.
More practices to come and hopefully some successes to report!

Monday, June 25, 2012

New Jewelry

Made some new pieces of jewelry today!  I can't remember the last time I made something for myself and with the possibility of a new job coming up, I need some new pieces to jazz up my outfits.  These were some very easy pieces to throw together (actually did them all while watching a movie) and will go great with the perfect outfit.

This is actually a very long necklace that I looped so I could take a pic.  It is only one layer.


This is actually only one long layer also.

 
Bracelet
Back of bracelet (terrible photo)

Friday, June 22, 2012

Marshmallow Fondant Trials

Recently I have been teaching myself how to decorate cakes.  I decided to try fondant, but I know nothing about it.  I have never even tasted fondant but it always looks so pretty so I thought I'd try it.  I found several recipes for Marshmallow fondant here , here and here although all the recipes seem relatively the same, the comments where helpful and all of the reviews said it was easy and tasted great, so I was sold!

So far it was a very easy project.  The biggest lesson I learned the hard way was to not use Crisco when I dug my hands into the dough.  It was quite comical trying to get it back off my hands again.  Definitely use Crisco on your hands when mixing.  The other big difference was that most people used a kitchen aid mixer with the dough mixer/hook and I don't have a Kitchen Aid but that was no problem, just helped build a little muscle!
Supplies...and big mess.

Put some Crisco in a bowl on the side so you can dip your fingers in as needed

Sticky sticky sticky mess.  Mix most of the sugar into the bowl, makes less mess later

Finally done and I impatiently had to wait overnight to play with it

Very 1st attempts at roses.  I had to hang it upside down to keep the petals from falling too much.  Using the right amount of water to get them to stick was key.

Started small by attempting to cover an oreo.  Was not easy. 


This is where I stopped for now.  I am sure there will be more to come!

Recycled T-Shirt Pet Rug

Crochetd out of T-shirts


Flower Roses


My 15 year old cat, Skittles makes a great model!


Being Jobless 6/22/2012

So it has been a while since I have documented any of my new projects or experiments mostly because it has been a while since I've had time.  Recently I quit my job because I was really unhappy and was not able to immediately find another job so I have had almost an entire month of down time in the house by myself. Aside from spending 4-6 hrs a day searching for and applying for jobs, I have learned a few things about myself.  I have learned that I would not make a good homemaker.  I figured out I am a crafty procrastinator and have allowed my crafts to be the excuse for why the house isn't clean or completely unpacked.  I actually get more done when I have more on my plate (i.e. a job).  That way there is no time to think about distracting myself.  Sadly that also means my craft time is cut short also.

Having all this time off also means I have been able to pull out some of those older projects where I got the stuff for it but never had time to complete the projects.  This week's project has been to teach myself how to decorate cakes.  I started with homemade marshmallow fondant and worked my way up to making flowers, and practicing decorating oreo cookies.  Trust me, the youtube videos make laying fondant look much easier than it is.  I also want to try the royal icing flowers that way maybe one day I can help a friend make a wedding cake, or do the decorations for my own.  I would also have the skillset to do many birthday cakes in between.

One thing to learn about me is I am incredibly impatient and if I can find an easier/cheaper way to do something, I will try it.  Anyway, it's been a while since I've emptied the camera and I took a few pics of my experiments this week so I thought I'd share how they went right, and how they went very wrong.  That reminds me, I wish I had taken pictures but earlier this week I wanted to make pizza and we use the pillsbury pizza dough which I happened to have frozen.  We set it out but it was still frozen in the middle and by then I had already layed everything out and it was too late to give up.  I thought about microwaving it but that might have cooked it.  I don't know how to use the defrost setting for anything other than meat so....I pulled out the hair dryer and thawed the pizza dough with my hair dryer.  We had a good laugh and I'm sure it looked silly, but it worked and the pizza turned out great (thanks to mom's homemade pizza sauce recipe she gave me when I moved out of the house)!